
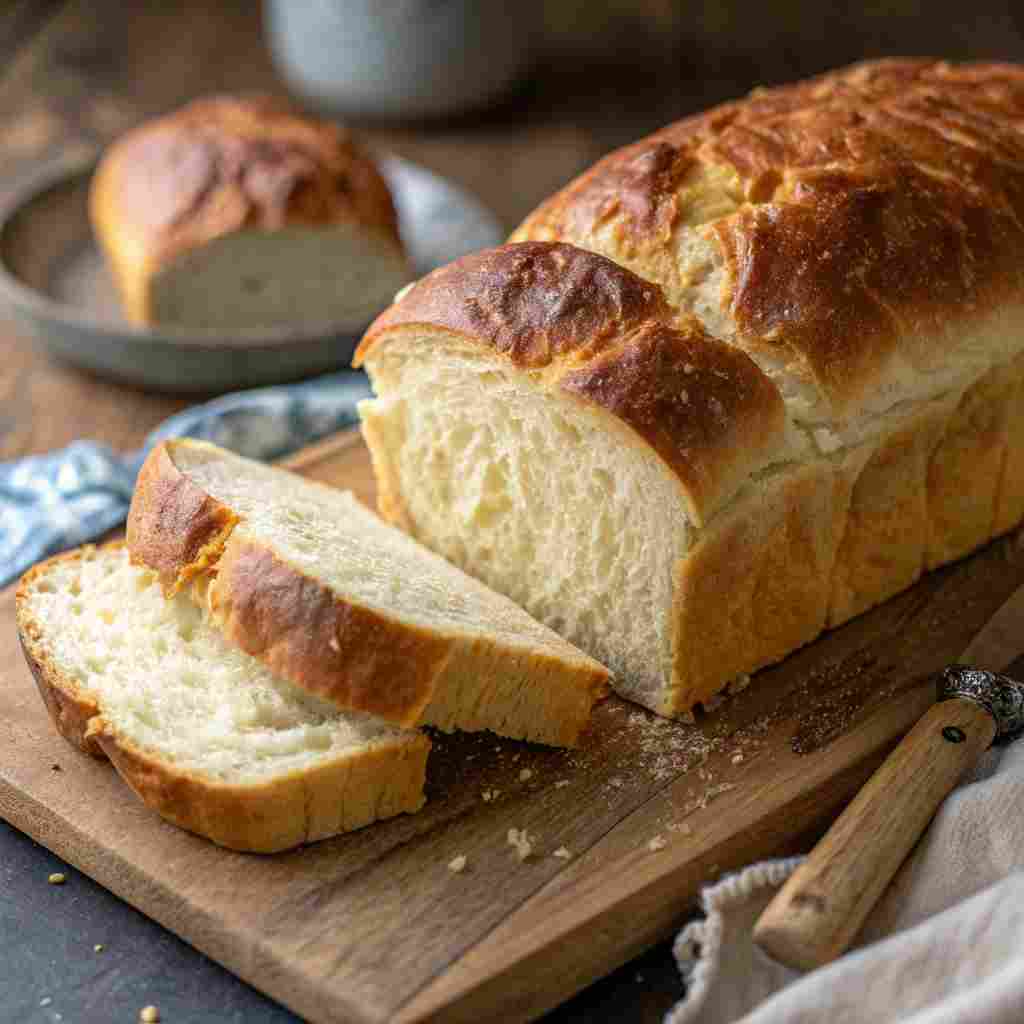
Homemade Amish bread is a classic, old-fashioned yeast bread known for its soft crumb, slightly sweet flavor, and comforting aroma. This recipe is perfect for home bakers who want a reliable, budget-friendly loaf that works for sandwiches, toast, or simply enjoying warm with butter. With simple pantry staples and easy steps, Homemade Amish bread is a timeless recipe worth mastering.
Key Ingredients for Homemade Amish bread
To make this comforting Homemade Amish bread, you’ll need a handful of simple, everyday ingredients. Each one plays an important role in creating the bread’s soft texture and gentle sweetness.
Warm water – 2 cups (about 110°F / 43°C)
Activates the yeast; the water should feel warm but not hot to the touch.Active dry yeast – 2 ¼ teaspoons (1 standard packet)
Helps the bread rise and creates a light, fluffy texture.Granulated sugar – ⅓ cup
Adds mild sweetness and feeds the yeast for proper fermentation.Vegetable oil – ⅓ cup
Keeps the bread moist and tender; can be substituted with melted butter if preferred.Salt – 1 ½ teaspoons
Balances the sweetness and enhances overall flavor.All-purpose flour – 5 to 5 ½ cups
Forms the structure of the bread; added gradually for the right dough consistency.Optional: melted butter – 2 tablespoons (for brushing tops)
Adds extra flavor and a soft, golden crust once baked.
How to Make Homemade Amish bread
Homemade Amish bread is loved for its simplicity, soft texture, and slightly sweet flavor that feels comforting and nostalgic. This recipe requires basic kneading, minimal equipment, and produces consistent results every time. From start to finish, including rising time, expect about 2½ to 3 hours, most of which is hands-off while the dough rises beautifully in your kitchen.
Step-by-Step Instructions
Step 1: Activate the yeast
In a large mixing bowl, pour in the warm water and sprinkle the active dry yeast over the top. Add the granulated sugar and gently stir to combine. Let the mixture sit for 5–10 minutes until it becomes foamy. This step ensures your yeast is alive and ready to help your Homemade Amish bread rise properly.
Step 2: Add wet ingredients
Once the yeast mixture is foamy, add the vegetable oil and salt. Stir gently until everything is evenly combined. This mixture forms the flavorful base of your dough and ensures the bread stays soft and moist.
Step 3: Incorporate the flour gradually
Begin adding the all-purpose flour one cup at a time, stirring with a wooden spoon or spatula after each addition. After about 4 cups, the dough will start to come together and pull away from the sides of the bowl. Add flour gradually until the dough is soft but not overly sticky.
Step 4: Knead the dough
Transfer the dough to a lightly floured surface. Knead for 8–10 minutes, using the heel of your hand to push the dough away from you, then folding it back over itself. Rotate and repeat until the dough is smooth, elastic, and slightly springy when pressed. Proper kneading is key to achieving the signature texture of Homemade Amish bread.
Step 5: First rise
Lightly grease a large bowl with oil and place the dough inside, turning it once to coat all sides. Cover the bowl with a clean kitchen towel or plastic wrap. Let the dough rise in a warm, draft-free area for about 1 to 1½ hours, or until it has doubled in size.
Step 6: Punch down and shape
Once risen, gently punch down the dough to release excess air. Transfer it back to a lightly floured surface and divide it evenly into two portions. Shape each portion into a loaf by flattening it into a rectangle and rolling it tightly from one end to the other, pinching the seam closed.
Step 7: Second rise
Place the shaped loaves into greased 9×5-inch loaf pans. Cover loosely and allow them to rise again for 30–45 minutes, until the dough rises just above the rim of the pans. This second rise gives Homemade Amish bread its soft and airy crumb.
Step 8: Bake the bread
Preheat your oven to 350°F (175°C). Bake the loaves for 25–30 minutes, or until the tops are golden brown and the bread sounds hollow when tapped. If the tops brown too quickly, loosely tent them with foil during the last 10 minutes.
Step 9: Finish and cool
Remove the loaves from the oven and brush the tops with melted butter if desired. Let the bread cool in the pans for 10 minutes, then transfer to a wire rack to cool completely. Allowing the bread to cool helps set the crumb and makes slicing easier.
Why You’ll Love This Homemade Amish bread
Homemade Amish bread stands out for its incredibly soft texture and lightly sweet flavor that feels both comforting and satisfying. It’s the kind of bread that works just as well for breakfast toast as it does for hearty sandwiches. Compared to store-bought white bread, this homemade version tastes fresher, richer, and far more wholesome.
Making Homemade Amish bread at home also saves money while giving you full control over the ingredients. You can enjoy thick slices with butter, jam, or honey, or use it for grilled cheese and French toast. If you love recipes like milk bread or classic farmhouse loaves, this one is a must-try—bake it at home and experience the difference for yourself.
Storing and Reheating Tips
- Room temperature: Store Homemade Amish bread in an airtight bag or bread box for up to 3 days.
- Refrigeration: Not recommended, as it can dry out the bread faster.
- Freezing: Wrap loaves or slices tightly in plastic wrap and place in a freezer-safe bag. Freeze for up to 3 months.
- Reheating: Thaw at room temperature or warm slices in a toaster. For whole loaves, reheat in a 300°F oven for 10–15 minutes.
Final Thoughts
Homemade Amish bread is a simple yet rewarding recipe that delivers soft, flavorful loaves every time. With basic ingredients and easy steps, it’s perfect for both beginners and experienced bakers. Try this recipe at home and enjoy the comfort of freshly baked bread made with care.
For more traditional Amish recipes and inspiration:
- Traditional Amish honey wheat bread recipe
- Amish sweet rolls with cinnamon sugar topping
- Easy Amish buttermilk biscuits for breakfast
- Amish pumpkin bread with spices
- Easy Amish rolls and loaves
- visit our Pinterest boards
Homemade Amish bread
Ingredients
Equipment
Method
- In a large mixing bowl, combine the warm water, active dry yeast, and granulated sugar. Stir gently and let sit for 5–10 minutes until foamy.2 cups warm water, 2 1/4 tsp active dry yeast, 1/3 cup granulated sugar
- Add the vegetable oil and salt to the yeast mixture and stir until evenly combined.1/3 cup vegetable oil, 1 1/2 tsp salt
- Add the all-purpose flour one cup at a time, stirring after each addition, until a soft dough forms.5 to 5 1/2 cups all-purpose flour
- Transfer the dough to a lightly floured surface and knead for 8–10 minutes until smooth and elastic.
- Place the dough in a lightly greased bowl, cover, and let rise for 1 to 1½ hours, until doubled in size.
- Punch down the dough, divide into two portions, and shape each into a loaf.
- Place the loaves into greased 9×5-inch pans, cover loosely, and let rise for 30–45 minutes until just above the rim.
- Bake in a preheated 350°F (175°C) oven for 25–30 minutes, until golden brown and hollow-sounding when tapped.
- Remove from the oven and brush with melted butter if desired. Cool in pans for 10 minutes, then transfer to a wire rack to cool completely.2 tbsp melted butter